Before you start
This page installs Network Scanner on the PC you will scan from and sets it up the way the course expects. It takes about fifteen minutes. You need:
- The installer,
netscanner_setup.exe, downloaded from the vendor and verified with its SHA-256 hash and Authenticode signature — see Download. - A Windows PC on the office network. The vendor lists Windows 7, 8, 8.1 and 10 and Windows Server 2008 R2 to 2016; on anything newer, test first.
- Either administrator rights on that PC, or the willingness to use the non-admin install mode.
- Your authorisation note from lesson 1, if you intend to scan straight away.
Pick the PC with care. At Kestrel it is the IT laptop, KT-IT01, which has a reserved address on the staff segment and can reach the server and camera segments through the router. A PC on the guest Wi-Fi, or one connected through a VPN that only routes some subnets, will see a different network — lesson 1 explains why that matters.
Administrator or non-admin install?
On Windows 7 and newer the classic install needs administrator rights. Since version 4.4.221 the installer also offers a mode that installs without them, and it asks which one you want.
| Administrator install | Non-admin install | |
|---|---|---|
| Needs admin rights | Yes, once, during setup | No |
| Who can use it | Every user of the PC | The account that installed it |
| Good for | A dedicated IT PC used by several admins | Your own profile on a locked-down PC |
| Scanning | No admin rights needed | No admin rights needed |
Either way, you scan as a normal user. That matters for lesson 11, where you run the program as a standard test account: it works because scanning never needed administrator rights in the first place.
Install step by step
Run the verified installer
Double-click
netscanner_setup.exe. If Windows shows a User Account Control prompt, check that the verified publisher shown is LizardSystems before you allow it. A prompt showing “Unknown publisher” means the signature is missing: stop and go back to the download checks.Choose the install mode
When the installer asks, choose the administrator install for a shared IT PC or the non-admin install for your own profile, as above.
Accept the licence agreement
Read it — the key points are summarised on the Download page: personal use is free, business use needs a per-machine licence, and the evaluation lasts 30 days.
Keep the default folder
Unless your organisation has a rule about where software lives, accept the suggested folder. It keeps updates and support simple.
Finish and launch
Let the installer finish and start the program. The installer is clean — the vendor states it has no adware or bundled software — so there are no extra offers to untick.
First launch and the licence
An unregistered copy runs as a full 30-day evaluation and shows reminder screens. What you do next depends on how you will use the program:
| Situation | What to do |
|---|---|
| Home network, learning, non-commercial | Use the vendor’s “Get free license” option to register for a free personal key. Registering removes the startup reminder. |
| Work network, deciding whether to buy | Use the 30-day evaluation; it has no functional limits. Note the start date. |
| Work network, decided | Buy a business licence for each machine that will run it and enter the key the vendor sends. |
Registration needs internet access; scanning does not. If your scanning PC has no internet access, follow the vendor’s instructions for registering, or ask their support.

Course-ready preferences
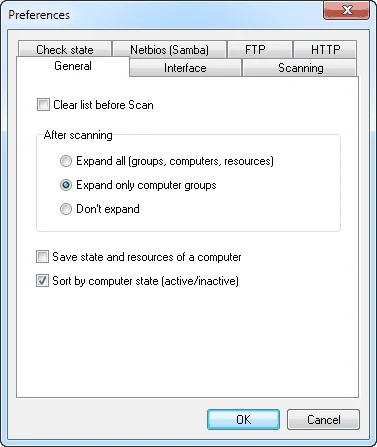
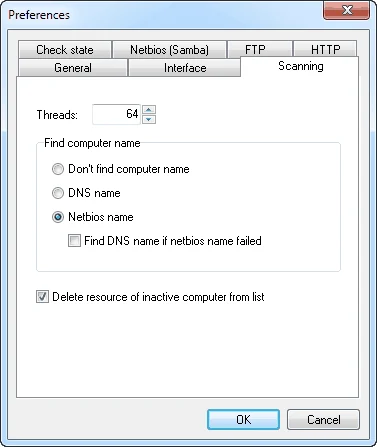
Network Scanner works out of the box, but a few preferences make the course’s results consistent with what the lessons show. Open the Preferences dialog; it has tabs for General, Interface, Scanning, Check state, Netbios (Samba), FTP and HTTP.
| Tab | Setting | Course value | Why |
|---|---|---|---|
| General | Clear list before Scan | On | One scan per result file makes comparisons honest (lesson 7) |
| General | After scanning | Expand only computer groups | A readable tree; expand computers as you need them |
| General | Sort by computer state | On (default) | Active computers first |
| Scanning | Threads | 64 (default) | Plenty for a few hundred addresses |
| Scanning | Find computer name | Netbios name + DNS fallback | Windows hosts report their own names; appliances fall back to DNS (lesson 6) |
| Check state | Type of checking | Ping, with ports 445,139,80,443 and “If check failed try another method” | Finds hosts whose firewall ignores ping (lesson 6) |
| Netbios (Samba) | Authorization | Current user | Change only for the test-user scan in lesson 11 |
| FTP | Authorization | Anonymous | Finds servers that let anyone in (lesson 8) |
| HTTP | Port list | 80, 8080 plus your devices’ ports | Finds every web console (lesson 8) |
Set up your workspace
Create the course’s notebook folders now so that nothing lands in Downloads or Documents by accident:
New-Item -ItemType Directory C:\LANScan365\results, C:\LANScan365\exports, C:\LANScan365\notes -ForceThen record the installation itself: the date, the version you installed, the verified hash, the licence type and the PC. It is a four-line note, and it answers the first questions anyone reviewing your work will ask.
Installed: 2026-09-15 on KT-IT01 (administrator install)
Version:   21.07, netscanner_setup.exe, SHA-256 5421a6dd...63f8d6 (matches vendor), signature Valid
Licence:   30-day evaluation started 2026-09-15; business licence ordered 2026-09-16
Settings:  see check-profile.md
Updating and uninstalling
To update, download the new installer from the vendor, verify it the same way (a new version has a
new hash), and run it. Your saved result files in C:\LANScan365\results\ are separate
from the program and are not touched.
To uninstall, use Settings → Apps (or Programs and Features in Control Panel on
older Windows), find Network Scanner and choose Uninstall. If you are retiring the PC that held
your scans, move C:\LANScan365\ to wherever your organisation keeps IT records first
— the notebook is more valuable than the program.
If the install goes wrong
“Windows protected your PC” (SmartScreen)
Likely cause: SmartScreen warns about files it has not seen often, even signed ones.
Fix: Check the hash and signature again. If both match the vendor, choose More info and run it. If they do not, delete the file.
The installer asks for administrator rights you do not have
Likely cause: You chose, or defaulted to, the administrator install.
Fix: Run it again and choose the non-admin mode, or ask IT to install it for all users.
The program starts but some windows are blank
Likely cause: The program uses the Internet Explorer component, which may be restricted on your PC.
Fix: The vendor requires the IE 8+ component; check with whoever manages your Windows images whether it has been removed or locked down by policy.
Endpoint protection quarantines the file
Likely cause: Some security tools treat any network scanner as a potentially unwanted program.
Fix: Talk to whoever runs your endpoint protection; show them the hash, the signature and your authorisation note, and ask for an exception for the verified file.
Installed and configured? Go to lesson 4: Your first scan — or, if you have not started the course yet, begin with the map in lesson 1.