Why a baseline beats a better scan
A single scan tells you what is on the network right now. It cannot tell you what is new. And new is where most trouble starts: the laptop a contractor plugged in, the NAS someone bought for “just the photos”, the test server that was never switched off.
A baseline is a scan you have reviewed and accepted: everything in it is known, has an owner and is meant to be there. Every later scan is compared against it. The comparison is short — usually a handful of lines — and every line is a question worth asking.
You do not need to understand a thousand rows every week. You need to understand the five that changed.
Keep result files that can be compared
Comparisons only mean something if the scans are alike. Three rules:
- Same targets. Use the same saved target set each time — the one built in lesson 4.
- Same check profile. The settings from lesson 6; a scan with a different timeout or port list will “find” hosts that were always there.
- Same time of day. A Friday-evening scan will miss every laptop that went home. Kestrel scans at 10:00 on a weekday.
Save each scan with File → Save as… into C:\LANScan365\results\
with the date first in the name so files sort in order. The accepted baseline gets a clear name
— Kestrel uses BASELINE 2026-09-04 — and is never overwritten.
First scan and Last scan
Network Scanner can record when it first saw each computer and when it last saw it, in the First scan and Last scan columns, which sit alongside Name, Address, Latency and Comment. Load your baseline, run the scan again, and the two dates start to work:
| Pattern | What it usually means | What to do |
|---|---|---|
| First scan = today | Never seen before | Identify it and its owner today |
| Last scan = weeks ago | Gone, or switched off for a long time | Confirm with the owner; retire it from the map if it is gone |
| Last scan jumps around | A laptop, or a device that sleeps | Normal; judge over several scans |
| First scan = today on a known name | Rebuilt or renamed machine, or a new address | Check the address plan and DNS |
Sort by First scan, newest at the top. Everything above your baseline’s date is new.
Comments that survive the next scan
Each computer and resource can carry a comment. In a baseline, use them to record your decisions: “Owner: payroll manager”, “Known — reception PC”, “Retire Q4”. Comments are saved in the result file, so when you load the baseline next month your notes are still there next to the rows they describe.
A good test of a baseline: every computer that is not a standard desktop has a comment saying what it is and whose it is.
Export to HTML, XML or TXT
Result files are for Network Scanner. For everything else — your notes, a report, a quick comparison — export. Network Scanner exports the list to three formats:
| Format | Best for |
|---|---|
| HTML | Reading and sharing: open it in any browser, attach it to a report (lesson 12) |
| XML | Structured processing: PowerShell can read it with [xml](Get-Content file.xml) |
| TXT | Quick searches and comparisons with Select-String and Compare-Object |
Export every scan you keep to C:\LANScan365\exports\, using the same date-first name
as its result file. There is no CSV export; if you need a spreadsheet, open the HTML export in Excel
or process the XML.
Compare two scans with PowerShell
Network Scanner does not have a built-in “compare two results” view, and it does not need
one: Windows already does. Make a plain list of computer names from each export — one name per
line — and let PowerShell find the differences. How you extract the names depends on which export
you use; with a TXT export, Select-String with a pattern matching your naming convention
does the job, and it is worth checking the list by eye the first time.
Select-String -Path .\2026-09-18.txt -Pattern '\b(KT-[A-Z0-9-]+|DESKTOP-\w+|LAPTOP-\w+)\b' -AllMatches |
  ForEach-Object { $_.Matches.Value } | Sort-Object -Unique |
  Set-Content .\names-2026-09-18.txt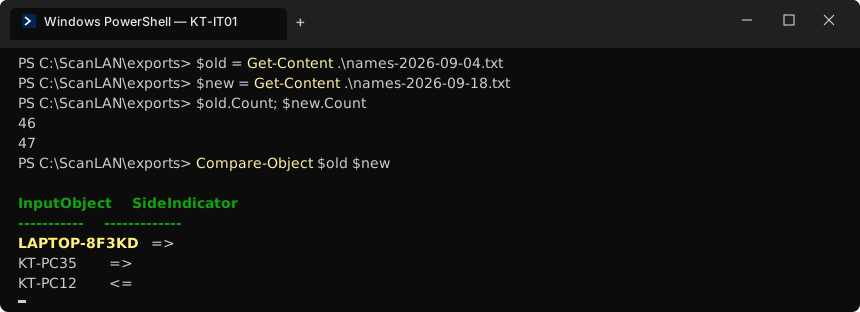
=>), one has gone (<=).Read the arrows as “which side is it on”: => only in the new scan,
<= only in the old one. At Kestrel:
- KT-PC35 — new desktop for a new starter. Expected; added to the map.
- KT-PC12 — missing. The owner was on leave and the PC was off. Checked again the following week: present.
- LAPTOP-8F3KD — not our naming convention, not on the map. Nobody expected it.
Tracking down a stranger
A device you do not recognise is not automatically a threat — most turn out to be a visitor on the wrong Wi-Fi or a personal laptop — but it has to be explained. Work outwards from what the scan gives you:
Look at what it shares
In the tree, LAPTOP-8F3KD at 172.16.40.143 shared nothing and had 4 ms latency: a Windows laptop, on the staff Wi-Fi, with sharing off. A default Windows name means it was never joined to the domain.
Ask DHCP who it is
On the DHCP server, the lease shows the hardware address, the host name and when it was handed out.
Get-DhcpServerv4Lease -ComputerName KT-DC1 -ScopeId 172.16.40.0 | Where-Object HostName -like 'LAPTOP-8F3KD*'gave the lease time: Monday, 08:51.Ask the network where it is
The Wi-Fi controller or the switch’s address table turns a hardware address into an access point or a port — at Kestrel, the meeting-room access point.
Ask people
Monday morning in the meeting room: an auditor from the firm’s bank, given the staff Wi-Fi password by a helpful colleague. The fix was not technical — the guest network exists for exactly this — but the finding went into the log, and the Wi-Fi password was changed.
Exercise: your first changes log
- Pick your lesson 6 result as the baseline. Review it, comment the non-standard computers, and save it as
BASELINE <date>. - At least a few days later, scan again with the same targets and check profile.
- Export both to TXT, build name lists, and run
Compare-Object. - For every difference, write one line in
C:\LANScan365\notes\changes-log.md: name, address, new or gone, explanation, owner, action. - Anything you cannot explain within a day goes to the top of the log.
| Date       | Name         | Address       | Change | Explanation                  | Owner  | Action              |
|------------|--------------|---------------|--------|------------------------------|--------|---------------------|
| 2026-09-18 | KT-PC35      | 172.16.40.161 | new    | New starter desktop          | IT     | Added to map        |
| 2026-09-18 | KT-PC12      | —             | gone   | Owner on leave, PC off       | IT     | Re-check 09-25      |
| 2026-09-18 | LAPTOP-8F3KD | 172.16.40.143 | new    | Bank auditor on staff Wi-Fi  | Office | Wi-Fi key changed   |
Checkpoint
Tick these off before moving on. If one fails, the lesson section above it has the fix.
- You have at least two dated result files made with the same check profile
- First scan and Last scan columns are visible and you know what each date means
- Each scan you keep also has a TXT or XML export in
C:\LANScan365\exports\ changes-log.mdexplains every host that appeared or disappeared between the two scans