Put the findings in one list
Eleven lessons have left findings in several notes: the changes log, the services register, the access review, the hidden-shares list, the user view. Before you fix anything, pull them into one table and rate each one. A simple scale is enough: high if an ordinary account or anyone on the LAN can read or change something important, medium if it needs a second mistake to matter, low if it is tidiness.
| # | Finding | Found in | Severity | Owner | Fix |
|---|---|---|---|---|---|
| 1 | Deploy$ on KT-FS1: Everyone Full Control; writable by test.user | L10, L11 | High | IT | Restrict to Admins Full, Staff Read |
| 2 | KT-NAS: anonymous FTP with the backup folder listed | L8 | High | IT | Disable FTP on the NAS |
| 3 | KT-PRN1: factory admin password on the web console | L8 | High | Office manager | Change password, store it in the vault |
| 4 | KT-NAS: SMB1 enabled | L12 check | Medium | IT | Disable SMB1 in the NAS console |
| 5 | KT-FS1: SMB signing not required | L12 check | Medium | IT | Require signing |
| 6 | Scans: Everyone Change | L9 | High | Office manager | Done in lesson 9 — verify |
| 7 | KT-PC09 shares a folder; KT-PC09\Temp$ leftover | L9, L10 | Low | IT | Move data, remove shares |
| 8 | Staff Wi-Fi password given to a visitor | L7 | Medium | Office manager | Changed; guest Wi-Fi instructions at reception |
Fix in order of severity, but group changes by system so each server is touched once, inside a normal change window, with its owner aware.
A fix is not finished when the setting changes. It is finished when a scan shows the new behaviour.
Fix the shares
Deploy$ gets the change planned in lesson 10: Everyone removed, Administrators Full Control, Staff Read, a description, and matching NTFS permissions. Scans was fixed in lesson 9; here you only verify it. The leftover shares on KT-PC09 are removed after the owner has moved anything worth keeping to KT-FS1.
Get-SmbShare | Where-Object { -not $_.Special }      # confirm what is shared
Remove-SmbShare -Name 'Share' -Force
Remove-SmbShare -Name 'Temp$' -Force
Fix the devices
Appliances are fixed in their own web consoles, not with Windows tools, so the steps vary by make. The pattern is the same for all of them:
KT-NAS: turn off FTP and SMB1
In the NAS console (port 5000), disable the FTP service entirely — nothing needs it. In the file-service settings, set the minimum SMB version to SMB2 or later. Backups still work: the backup job uses SMB with its own account.
KT-PRN1: replace the factory password
In the printer console, set a long unique admin password and store it in the IT password vault with the printer’s name. While you are there, check that scan-to-FTP uses its own account and that the console is not reachable from the guest network.
Firmware while you are in there
Note the firmware version of each device in the services register. If the vendor has a newer one, schedule the update — known flaws in old firmware can undo the benefit of a strong password.
Tighten SMB on the servers
Two settings on Windows file servers are worth checking on every network, with
Get-SmbServerConfiguration: SMB1 should be off (it is by default on modern Windows), and
SMB signing should be required, which protects sessions from being tampered with on the way.
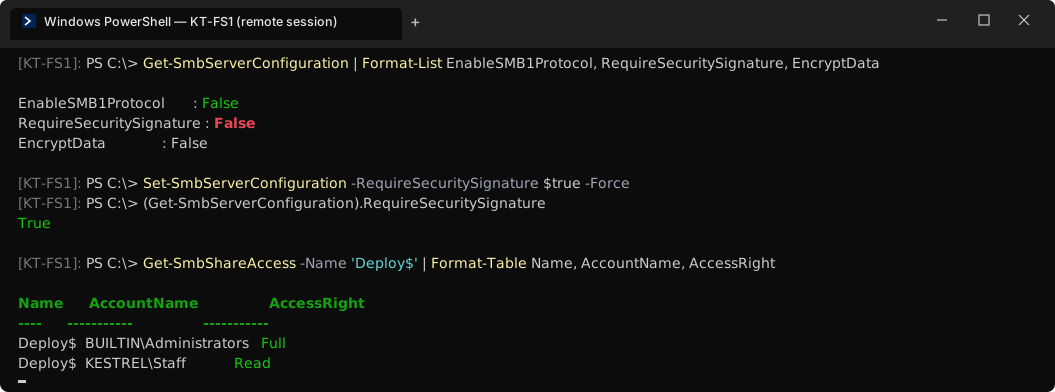
In a domain, set these through Group Policy rather than per server, so a rebuilt server comes back the same way: Microsoft network server: Digitally sign communications (always) under Security Options. Test with an older multifunction printer first — some old scan-to-folder implementations cannot sign, which is a reason to replace them, not to leave signing off.
Make Network Scanner your admin launcher
Network Scanner’s Administrative tools and Network tools menus run programs against the computer you have selected in the tree. The Manage tools dialog controls what is in them. Out of the box you get Remote desktop, Shut down, Computer management, Services management, Event viewer, Local users and groups manager and Shared folders; since version 21.02 there are also Remote shutdown and Send message tools.
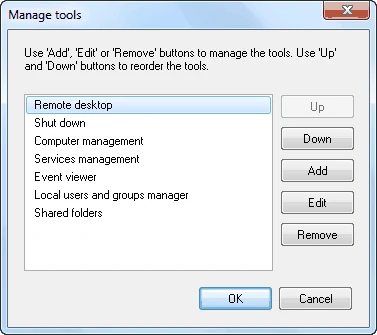
For this lesson, Shared folders is the useful one: select KT-FS1 in the tree, open Shared folders, and you are looking at the server’s shares, sessions and open files — the quickest way to check a share’s permissions straight after a scan flags it. Move the tools you use most to the top with Up, and Remove the ones you never want to click by accident; a one-click Shut down next to Remote desktop is a risk on a file server.
Re-scan to prove it
Now repeat the scans that found the problems, with the same targets and check profile:
| Scan | As | Expected result after the fixes |
|---|---|---|
| Netbios + Check access | it.admin | Deploy$ still Write for admins; Temp$ and KT-PC09\Share gone |
| Netbios + Check access | test.user | Deploy$ Read, not Write; Payroll still Access denied |
| FTP + HTTP | — | No FTP service on KT-NAS; KT-PRN1 console still present (password changed) |
Save each result with a post-fix name and export the test-user scan to HTML. Where a
result is not what you expected, the fix is not done — go back one step. At Kestrel the first
re-scan still showed Deploy$ writable as test.user: the NTFS change had been made on the wrong folder.
That is exactly why you re-scan.
Write the report
The report is for the person who owns the risk — at Kestrel, the managing partner who signed the authorisation in lesson 1. Keep it short enough to be read: two pages plus attachments. A structure that works:
1. Scope        What was scanned, from where, when, under which authorisation
2. Method       Network Scanner (Check access as admin and as a standard user),
                FTP/HTTP discovery, Windows checks (Get-SmbShare, icacls, Test-NetConnection)
3. Summary      3-5 sentences a non-technical owner can act on
4. Findings     | # | Finding | Severity | Owner | Status | Evidence |
5. What works   Controls confirmed (e.g. Payroll denied to staff)
6. Open items   Anything not fixed, with owner and date
7. Next review  When the next baseline comparison and user-view scan happen
Attachments     post-fix HTML export, user-view.md, access-review.md
“What works” is not padding. Showing that Payroll is correctly closed, with the scan as evidence, is as useful to the business as the list of problems — it is what the owner can tell an auditor or an insurer.
After the course
A network drifts back to where it started unless someone keeps looking. You do not need a big programme; you need a few repeatable habits, each of which is a lesson you have already done:
- Every couple of weeks: re-scan with the saved targets and compare with the baseline (lesson 7). Explain every new name.
- Every quarter: the writable-shares review and the user-view scan (lessons 9 and 11), then update the access review.
- After any change to a file server, printer or NAS: a targeted re-scan of that device.
- Once a year: refresh the map and address plan, re-run everything, and write a new report.
Questions about any of this? The FAQ collects the ones readers ask most.
Exercise: close, prove, report
- Merge your findings into one table with severity and owner.
- Fix the high findings, one change at a time, testing the business process after each.
- Re-scan as your account and as the test account; save and export the results.
- Write the report using the structure above and send it to the owner of the risk.
- Update the map, address plan, share register and services register, then save a new baseline.
Checkpoint
Tick these off before moving on. If one fails, the lesson section above it has the fix.
- Every high finding is fixed, or has an owner, a date and a written reason for waiting
- A post-fix scan with Check access, as both your account and the test account, is saved and exported
- The HTML export of the post-fix scan is attached to the report
lan-security-report.html(or your organisation’s format) has been sent to its owner- Your map, address plan and registers are updated to match the network as it is now