Set up the lab notebook
From this lesson on, you will produce files that later lessons need. Create the folders once, now,
so nothing ends up in Downloads:
New-Item -ItemType Directory C:\LANScan365\results, C:\LANScan365\exports, C:\LANScan365\notes -ForceIf you have not installed Network Scanner yet, do that first — the install guide covers it, including the preference settings this course assumes. Scanning does not need administrator rights, so run the program as your normal account unless a lesson says otherwise.
A quick tour of the window
Network Scanner has a classic Windows layout. Across the top are the menus — File, Target, Address, Scan, Resources, Tools, View and Help — and a toolbar of large icons for the actions you will use most: adding targets, starting and stopping scans, searching, filtering and preferences.

Below the toolbar the window splits in two. The left pane has two tabs: Scan, where you pick targets and services, and Filter, which you will use in lesson 5. The right pane is the results tree, with a Resource name filter above it and columns for Name, Address, Latency and Comment.
Build the target list
The Target box at the top of the Scan tab holds a named set of targets (the first one is called “Default”), and below it a checklist of ranges, expressions and lists. Only the ticked entries are scanned, so you can keep everything in one set and choose per scan.
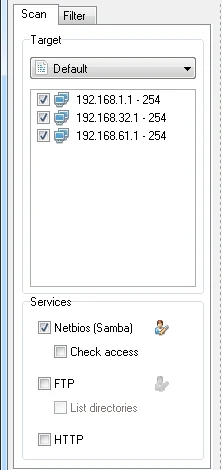
Add Kestrel’s three targets, using the plan from lesson 2:
A range for the staff segment
Choose the add-range command (toolbar or Target menu). Name it Staff, start
172.16.40.1, stop172.16.40.254.An expression for servers and cameras
Add an expression named Servers and cameras:
172.16.42-43.1-254. One line covers two segments.A list of the devices that must always answer
Add a list named Fixed devices and type the names from your map: KT-GW, KT-DC1, KT-FS1, KT-NAS, KT-PRN1, KT-PRN2, KT-NVR. A list scans by name, so it also tests that DNS resolves each one.
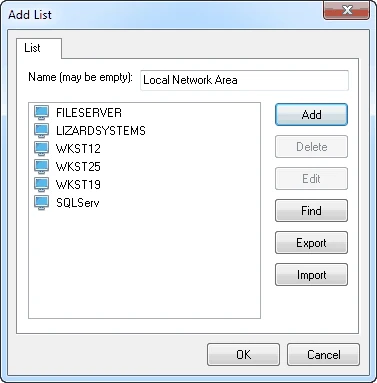
Choose what to look for
The Services box decides what the scanner asks each live host about:
| Service | What it finds | Sub-option |
|---|---|---|
| Netbios (Samba) | Windows and Samba shares, including hidden and administrative ones | Check access: test read/write on each share |
| FTP | FTP servers | List directories: read the folder listing |
| HTTP | Web servers and device web consoles | — |
For the first pass, tick Netbios (Samba) only and leave Check access off. There are three reasons. It is the fastest scan, so you get a result in minutes. It answers the lesson’s real question — does the network match the map? — without drowning you in detail. And it touches the network lightly: listing shares is something every Windows PC does all day, while access checks and FTP logins are more visible. You will turn the others on deliberately in lessons 8 and 9.
First scan: find the machines and their shares. Access, FTP and web come later, one question at a time.
Run, watch, stop
Tick all three targets and start the scan. Network Scanner is multi-threaded, so it checks many addresses at once; on a few hundred addresses a NetBIOS scan usually takes well under a minute. The status bar at the bottom shows progress counters and the elapsed time.
If something is clearly wrong — you ticked the wrong range, or the scan is crawling — stop it. Network Scanner stops a scan instantly, and whatever was found so far stays in the tree.
The scan finishes in a second and finds nothing
Likely cause: The PC cannot reach the target range, or every host is failing the online check.
Fix: Confirm your address with ipconfig (lesson 1). Try a single known host, e.g. the list with KT-FS1. If that fails too, see lesson 6 on ping versus TCP checks.
Computers appear but have no shares
Likely cause: They share nothing (normal for many desktops) or the firewall blocks SMB from your segment.
Fix: Compare with Get-SmbShare -CimSession <name>. If the server lists shares but the scan does not, check the firewall profile from lesson 3.
Names are missing or show only addresses
Likely cause: Name resolution failed or is switched off in Preferences.
Fix: Lesson 6 covers NetBIOS versus DNS names and the fallback option.
Save the first result
Network Scanner can save the whole result — targets, computers, shares, comments — to a
file and load it again later with File → Load. Use File → Save as… and
put it in C:\LANScan365\results\ with the date and scope in the name, for example
2026-09-18 netbios all-scopes.
This file is your baseline. In lesson 7 you will load it next to a later scan to see what changed. Save a copy of it somewhere that is backed up.
A first look at what came back
Lesson 5 is all about reading the tree, but do one thing now: compare it with your map. At Kestrel the first NetBIOS scan found:
| Expected | Found? | Note |
|---|---|---|
| KT-DC1, KT-FS1 | Yes | With SYSVOL/NETLOGON on the DC and the five business shares on KT-FS1 |
| KT-NAS | Yes | Shares Backup and Public |
| KT-PRN1, KT-PRN2 | Yes | Answer, share nothing over NetBIOS |
| KT-NVR, KT-GW | Not in NetBIOS results | Expected — they are not Windows or Samba hosts; lesson 8 finds them over HTTP |
| Staff PCs | 33 of 35 desktops | Two were switched off; three PCs are sharing a folder (lesson 9) |
| Not on the map | — | Nothing unexpected yet. Lesson 7 will be different. |
Write the same kind of comparison for your network. You are not judging anything yet — just noting what matches the map and what does not.
Exercise: your first saved scan
- Add a range, an expression and a name list built from your own address plan.
- Run a NetBIOS-only scan with Check access switched off.
- Save it as
C:\LANScan365\results\<date> netbios all-scopes. - In
C:\LANScan365\notes\first-scan.md, list each fixed device from your map as found / not found, and anything found that is not on the map. - Note how long the scan took; you will use it to judge tuning in lesson 6.
Checkpoint
Tick these off before moving on. If one fails, the lesson section above it has the fix.
- The Scan tab holds your Staff range, your servers-and-cameras expression and a name list of fixed devices
- A NetBIOS-only scan of all three has completed without you stopping it
- The result is saved in
C:\LANScan365\results\with a date in the file name - Every fixed device from your map appears in the tree, or is written down as missing